All the Process of Digitalizing the Video Game Graphic
All the Process in Digitalizing the Video Game
Application
In the first topic will be the application that I used to digitalize the graphic that I planned on the previous Task 2. The application I used to digitalize the graphic is the Adobe Photoshop where Fig.1 below shows the icon of the application, by using my own laptop because of it much easier to do something inside laptop due to laptop have larger screen than mobile phone. In short introduction of Photoshop, this application one of the common and usually use for beginner in order to design graphic, creating graphic by using the tools that been provided inside and also can be use for colour correction the image like shows on Fig.1.1 that shows Photoshop create video game character. Furthermore, this application also one of the application I also usually use in terms of designing any kind of graphic, therefore its easy for me to use it due to have experience using it.

Step of digitalizing Characters
Main Character
Step 1
Meanwhile, in terms of the process of steps that I did during the digitalizing are on the Step 1 where first I create the new project by clicking the file and new project or directly click new project like shows on Fig.2 below.

Step 2
After that, the setting of size will be appear. Since, I already know that my game is for android user only which is inside mobile phone, it makes my process much faster and easier due to the Photoshop have the preset of mobile phone size layout and properties of it. Like shows on Fig.3 below shows that after I choice the preset, I change the position of the into landscape type. Therefore, much more space for me to create more character in one save. Moreover, it can be seen on Fig.3 also the number of height and width I use which are 1920 pixel for the Width and 1080 pixel for the Height. After that by clicking create it automatically create it.

Step 3
For the next step, after create the size that I wanted, then I use only one tools to create the characters starting with the Main Character of the game which by using “Shape Tools” that shows on Fig.4 below. Therefore, in order I change the shape I clicked the right click on my mouse to change to another kind of shape. When I creating the characters, rather than import the references sketch I directly use the shape tools due to much more straight forward ways and also since the character mostly created with shapes.

Figure 4
Step 4
The fourth step I did after using the shape stool, when I creating the part of the body like shows on Fig.5 the head part, I change curve the 4 point end of the shape side to make the shape much more curve and much more round type. Like also can be seen on Fig.5 where I change it, as well can be seen also I fill the shape with the colour that label with green rectangle below. In addition, I also close or not use any stroke for my character, which means I only use fill of the shape and remove the stroke where can be seen on Fig.5 below where the stroke label with cross. That shows I don't use any stroke of the shape for my characters.

Final Step
The step 5 is the final step after I arrange the position of the character body and colour it then I group all the layer of the character into one. In order to avoid any confusion in terms of the characters layer since I create all character in one page. As a result the final product of the character like shows on Fig.6 below. Where in conclusion, I mostly use shape tools only to create the characters.

Boss
Step 1
For the process of another characters such as for the boss are the same steps like shows in creating the Main Character. But since, I create it into one save only. Therefore the first step is, I create the new layer of this character by clicking at the right bottom of it like shows on Fig.7 below.

Step 2
The next step is where I did the same like Step 3 on the main character, where I use shape tools like shows on Fig.4 above, then I created the boss according to the sketch that I did before starting with the body part.
Step 3
After that, I did the same like Step 4 on the main character above where I adjusted the 4 pointing side of the shape to make it curve and more rounded like also shows on Fig.5 above. During this step also, I start to fill the colour of the character according to the parts that I created.
Step 4
The final product where, I group also all the boss character layer into one. Therefore, I can moved the character and resize it smaller to make more space more another character. As a result Fig.8 below shows the final product of this character.

The process of other characters / game assets / pages and icon are all the same process like creating the main character and the boss like above. Only few, added step for certain game assets and pages that will be explain more below. However, Fig.9 below shows the all another character that been digitalize.

Figure 9
Game Assets Digitalizing
Like mention before, the step in creating the game assets also the same like creating the character. Therefore, Table 1/2/3/4/5 below shows the all game assets according to the stages on the video game.


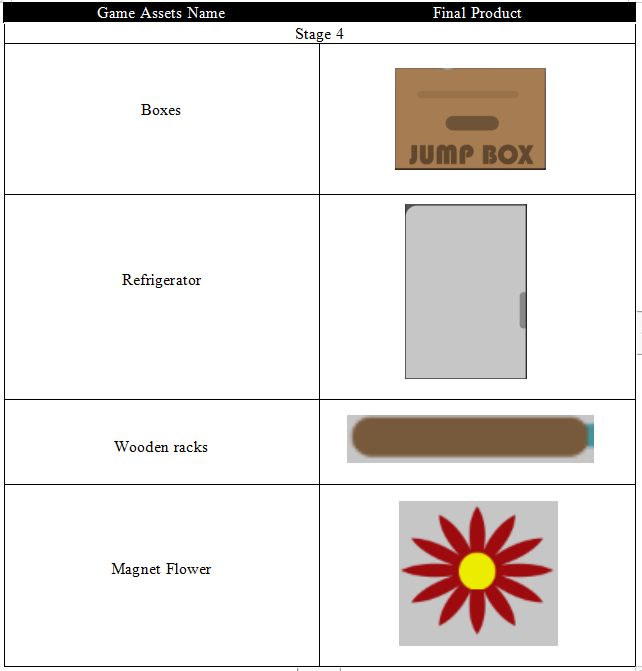

It can be seen on all table above shows the game assets of every stages. The new things here where can be seen on box have the name on it. On that case I add up another step by using “Text tool” to create an text on the box, where Fig.10 shows the tools of text tools.

For the setting button and also the health of the character as well the User Interface can be seen on Fig. 11 below that shows the final product of it. All of this where use in all stages that are a must for every stages above.


Figure 11
Digitalizing Background
By using the game assets above I used some of it according to my planning on the previous task such as the kitchen counters in stage 1 will be the background and much more. Therefore below shows the background of each stages, starting with stage 1 below.
Stage 1 Fig.12 below shows the background of it

Stage 2 Fig.12.1 below shows the background of it

Stage 3 Fig.12.2 below shows the background of it

Figure 12.2
Stage 4 Fig.12.3 below shows the background of it

Stage 5 Fig.12.4 below shows the background of it

For the Stage 4, the step on creating it different. The different only I terms of the mode of the layout only that rather than landscape, this stage use portrait mode kind of layout. Therefore, Fig. 13 below the layout properties of this stage 4 which is the Width is 1080 pixel and the Height is 1920 pixel.
Icon
In addition of this video game, I did also create the icon of the video game. The idea of creating this icon not planned during the task 3, which means I directly create it by using the main character head and half of the body t as the icon of the video game. Where can be seen the final product of it on Fig.13 below.
Pages (Wireframe)
For the pages of this video game. This only shows the pages of starting page, option page, victory page , game over page and loading page as well as the all stages final product that consists all the enemies and User Interface (UI). Furthermore, below shows the final product of all this video game pages.
Start Page sketch and Final Product (Fig.14 below)

Final Product
Option Page sketch and Final Product (Fig.14.1 below)


Victory Page sketch and Final Product (Fig.14.2 below)


Game Over Page sketch and Final Product (Fig.14.3 below)


Loading Page sketch and Final Product (Fig.14.4 below)
Sketch


Stage 1 sketch and Final Product (Fig.14.5 below)
Sketch


Stage 2 sketch and Final Product (Fig.14.6 below)


Stage 3 sketch and Final Product (Fig.14.7 below)
Sketch


Stage 4 sketch and Final Product (Fig.14.8 below)
Sketch

Final Product

Stage 5 sketch and Final Product (Fig.14.9 below)
Sketch

Final Product

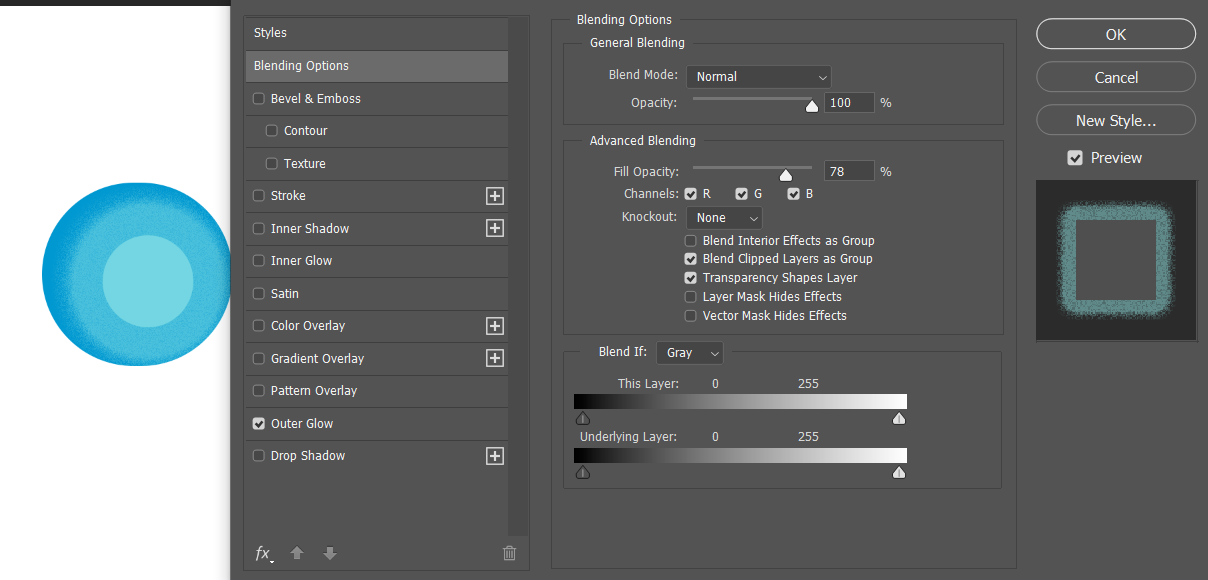
On the Stage 5, can be seen that the character use his power. The creation of the power are all the same like creating the main character but the different is the shape are glowing. In order, I make it glow by clicking the selected layer example the layer of the circle, by clicking twice. It will appear all the properties of setting of that shape, that then I only tick the outer glow one that shows on Fig.14.9.1 below.
Comments
Post a Comment